
After the completion of script recording and enhancement (i.e. correlation, parameterisation etc.), the next step is to define Populations under the Design section of the NeoLoad tool. Actually, a population is a group of Virtual User types having the same or different set of business and network behaviour.
NeoLoad tool is known for its simplicity and ease of configuration. The ‘Populations’ feature is one of them. The idea behind the ‘Populations’ concept is to separate the virtual user setting from the others. It represents the properties of the virtual user associated with different user paths or a set of user paths. Several different populations can be configured within the same project by setting virtual user load percentage, type of browser, WAN emulation etc. Later on, you can select the appropriate Populations while creating the scenario and run the test. Let’s try to understand the features and use of populations in detail.
Steps to create ‘Populations’
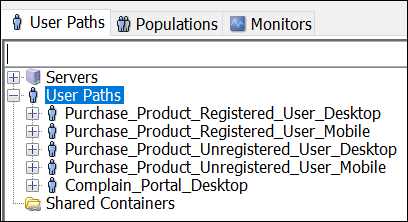
- Once the ‘User Paths’ are created and validated successfully click on the ‘Populations’ tab under the ‘Design’ section.

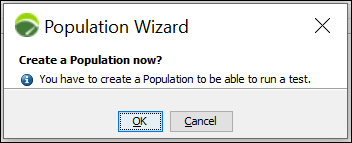
- On creating the ‘Populations’ first-time leads a warning pop-up forces you to create the population. So, click ‘OK’.
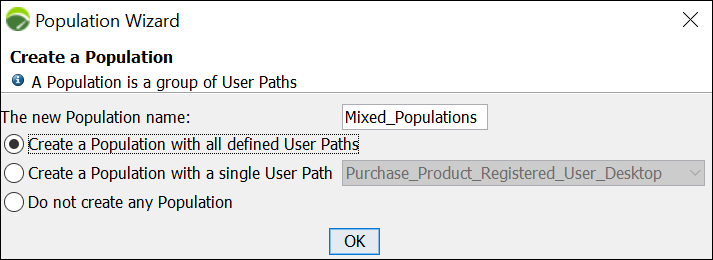
- Provide the name of the ‘Population’ and select the appropriate option among these three:
- Create a Population with all defined User Paths (For multiple test cases)
- Create a Population with a single User Path (For a single test case)
- Do not create any Population

Let’s divide it into 3 cases and try to understand each case along with examples:
Case 1: Create a Population with all defined User Paths
Consider there are 5 user paths under a project with the following details:
| Test Case | User Load % |
|---|---|
| Purchase_Product_Unregistered_User_Mobile | 10% |
| Purchase_Product_Unregistered_User_Desktop | 20% |
| Purchase_Product_Registered_User_Mobile | 20% |
| Purchase_Product_Registered_User_Desktop | 30% |
| Complain_Portal_Desktop | 20% |
| Total | 100% |
To create the ‘Populations’ for the above case, you need to select the first option i.e. Create a Population with all defined User Paths, provide the name of the populations (say Mixed_Populations) and click ‘OK’
You will get the equally distributed user load percentage and default setting for all the user paths. Refer to the below screenshot.

Use the ‘Parameter’ section to set:
- User Load Percentage
- Type of Browser
- WAN Emulation
- Handle cache

After setting all the parameters as per the given requirement, the populations will look like this:

Case 2: Create a Population with a single User Path
Consider there is only one user path named Purchase_Product_Registered_User with no specific browser or network requirement. To create the ‘Populations’ for this case, you need to select the second option, i.e. Create a Population with single User Paths, and provide the populations’ name (say Purchase_Product_Single_Scenario_Populations) and click the ‘OK’ button. In case there are multiple user paths available then select the appropriate user path from the list (dropdown).

You can see the default parameter values along with 100% user load allocated to the selected user path. Refer to the below screenshot:

You can change the value of the following ‘Parameters’ as per the requirement else use the default setting for:
- User Load Percentage
- Type of Browser
- WAN Emulation
- Handle cache
Case 3: Do not create any population
On selecting this option a blank ‘Populations’ tab opens.

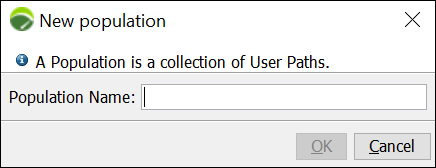
You can add a new population by clicking the ‘+’ sign at the bottom of the left pane then a pop-up will appear asking for the Population name. Provide the name of the population and click the ‘OK’ button.
A new population will be generated with the default parameters as same as in Figure 10.
So, you got the information about ‘How to create the Population in NeoLoad tool?’ Use any of the above-described methods and distribute the user load as per your requirement.
You may be interested: