
JMeter is an open-source performance testing tool that supports distributed testing. The popularity of JMeter is more than any other freeware performance testing tool. This is a lucrative PT tool because it has all the basic features like ease of installation, scripting, execution, reporting and support for all the basic protocols. Another good feature of JMeter is that you can customize the features easily to enhance its existing functionalities. That is why many third-party plugins are available on the internet which fulfils the tester’s requirement.
Apart from scripting component enhancement, when licensing and its pricing comes into the picture where a client needs to pay a big amount to borrow the paid licenses or cloud infrastructure to continue the execution of performance test; JMeter provides a free solution. Of course, the client has to invest some bucks in the physical/virtual machines. However, it is less than the cost of purchased licenses. These physical/virtual machines are also known as Load Generator.
What is Distributed Testing in JMeter?
Distributed Testing in JMeter helps to scale up the capacity of JMeter to generate the desired number of threads (users) to perform the Load Test. The distributed testing follows the master-slave architecture where JMeter resides on all the machines and interacts via Java RMI (Remote Machine Invocation).
In the distributed architecture, all the machines (master and slaves) are in the same (local) network. Among them, one machine is treated as a master which controls the other slave machines during test execution. The slave machines follow the instruction initiated by the master machine and then hit AUT (application under test) i.e. send the request to the target server.
A typical architecture of distributed testing is:

How to set up a distributed testing environment for JMeter?
The following points will help to set up a distributed environment for JMeter:
- Check – how many threads can be handled by 1 machine?
- Estimate – the number of required slaves (of the same hardware & software configuration) based on the thread count handled by 1 machine. For example, if one machine can handle 200 threads and the target load is 1000 threads (users) then 5 (=1000/20) slaves machine will be required.
- Install – the JMeter of the same version on all the slaves including Master. It is recommended that copy the same JMeter set-up on all the machines and do the installation.
- Make Sure:
- The firewall should be turned off on all the machines.
- Anti-virus should be disabled (not for all case, only recommended when anti-virus interrupt the RMI communication between master and slaves).
- All the machines (slaves and the master) should be in the same network.
- The target application (server) should be accessible from all the machines.
Once this is done then the distributed environment is ready for test execution.
What are the steps to follow before starting the test in a distributed environment?
Once the script is completed and runnable at the local machine then there are some configuration settings which need to be done in JMeter installed at the Master and Slave machine which are as follows:
Master Machine JMeter Configuration:
To communicate with the slave machines, the master machine’s jmeter.properties file needs to be updated. To modify the jmeter.properties of the master machine follow these steps:
- Open <JMETER_HOME>/bin/jmeter.properties in Notepad or Notepad++
- Search using the “remote_hosts” keyword.
- Add the IP Address or Host Name of all the slave machines (the name should be separated by a comma).

Slave Machine JMeter Configuration:
There is no such configuration to the set-up file of slave machines. But if the script has any external CSV test data file, text file, custom log file etc. then these files need to be placed at the correct, exact and same location in all the slave machines. The absolute or relative path of the file along with the file name must be the same for all the slave machines. It is advisable to place the test data file in the bin folder of JMeter so that only the name of the file can be provided instead of the full path. This will reduce the probability of failing the test due to the ‘file not found’ issue when the file path is wrong.
Another pre-requisite is to start the JMeter-server service on all the slave machines. This service can be started by executing the below command
For Unix
./jmeter-server
For Windows
jmeter-server.bat (on Windows)
The jmeter-server file is available in <JMETER_HOME>/bin folder. Once you hit the command then the below message must appear.

You may get some challenges (or errors) while starting jmeter-server service. The solutions for those common issues are provided in the challenge section.
How to execute a test on a distributed testing environment in JMeter?
Before starting the test in a distributed environment, the number of threads calculation is required. Let’s say the target user load is 1000 and there are 5 slaves then the ‘Number of Threads (users)’ field will have the input as 200 (=1000/5). This is because the master machine sends a copy of the JMeter script to each slave machine and according to the script input each slave generates the load and executes the test. Likewise, the accumulative generated load is equal to the target load. Master machine JMeter does not have the capability to divide the number of threads according to the available slaves. Hence a manual intervention is required for the number of threads allocation.

JMeter distributed test execution can be conducted in two ways (similar to normal test execution)
1. GUI Mode:
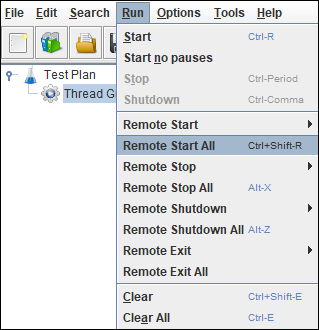
In GUI mode, JMeter UI is launched on the master machine. If the test needs to be started using specific slaves then those slaves need to be chosen from the Run menu. Follow the flow:
JMeter Menu -> Run -> Remote Start -> Click the name of the host (s)

To start the test using all the defined hosts (slaves) in one go, click on
JMeter Menu -> Run -> Remote Start All
OR
Press ‘Ctrl+Shift+R’
2. Non-GUI Mode:
To execute the test in non-GUI mode, first, navigate to the /bin folder of JMeter and run the following command:
For Windows:
jmeter -n -t <script path> -l <log file path> -r
For Unix:
./jmeter.sh -n -t <script path> -l <log file path> -r
The test can also be executed by selecting specific slave machines.
For Windows:
jmeter -n -t <script path> -l <log file path> -R server1,server2,server3,
For Unix:
./jmeter.sh -n -t <script path> -l <log file path> -R server1,server2,server3,
Important Points:
- Divide the target user load with the number of slave machines and use that figure as the ‘Number of Threads (users)’ input in Thread Group.
- When a unique test data scenario needs to execute then test data in the CSV data set config file placed at a different slave; must be unique. The same copy of the CSV file will produce duplicate data.
- All the slaves (load generators) must be in the same network so that there is no discrepancy in the network latency which impacts the result.
- This port can be controlled by JMeter property called client.rmi.localport in jmeter.properties. If there are any firewalls or other network filters between the JMeter client and server, you will need to make sure that they are set up to allow the connections through.
Confirmation of successful test start:
At Master End:

At Slave End:

Challenges in distributed testing:
- Unsupported major.minor version
- Server failed to start: java.rmi.server.ExportException
- Connection refused to host
Wonderful, Thanks
Comments are closed.