
In the heap dump and thread dump analysis topics, we have seen how the snapshot of memory and thread at a particular time describes the whole picture and helps to determine the performance bottleneck. In a similar fashion, the Automatic Workload Repository (also caller AWR) report provides information about the database bottleneck.

Dump vs AWR:
The difference between the dump (heap or thread) and Automatic Workload Repository report is that dump reports are the actual snapshots taken at a particular time whereas AWR report is a comparison report of two snapshots taken at different timestamps.
AWR Report Overview:
Generally, AWR snapshots are taken on an hourly basis and include wait interface statistics, top SQL, memory, and I/O information and are stored in the Oracle data dictionary. Each snapshot is identified by a snapshot ID. The AWR report process takes the cumulative data from two snapshots and subtracts the earlier snapshot’s cumulative data from the later snapshot and then generates a delta report showing the statistics and information relevant for the time period requested.
By default, the system takes the AWR snapshots on an hourly basis but you can customize the duration as per the requirement. A user can also use the snapshot IDs to generate the report between a particular time duration.
The snapshots are available in the ‘DBA_HIST_SNAPSHOT’ view. If you want to generate the snapshot at a particular time (apart from the default snapshot generation) then you can run the below procedure to manually generate the snapshot.
EXEC dbms_workload_repository.create_snapshot;
The newly created snapshot can be viewed in ‘DBA_HIST_SNAPSHOT’. You can also see the default-generated snapshots in the same view.
AWR reporting resources are available in the Enterprise Edition. You can view all the resources in $ORACLE_HOME/rdbms/admin and generate the report by executing the respective SQL script.
The file format of the Automatic Workload Repository report can be text or HTML.
Important SQL scripts:
- AWR (Automatic Workload Repository) Report: awrrpt.sql
- AWR Global Report: awrgrpt.sql
- ADDM (Automatic Database Diagnostic Monitor) Report: addmrpt.sql
- AWR Single SQL Statement Report: awrsqrpt.sql
- AWR Diff Report: awrddrpt.sql
- ASH (Active Session History) Report: ashrpt.sql
- AWR Global Diff Report: awrgdrpt.sql
AWR Features:
The Automatic Workload Repository report provides:
- Wait-events causing a delay
- Highlights query taking long Elapsed time or execution time
- Report on CPU utilization and memory usage
- Blocking sessions and many other important stats which we will be discussed in later posts.
AWR report generation:
1. Log in to the database.
2. Run the command to generate the report SQL> @ $ORACLE_HOME/rdbms/admin/awrrpt.sql then you will see below output:
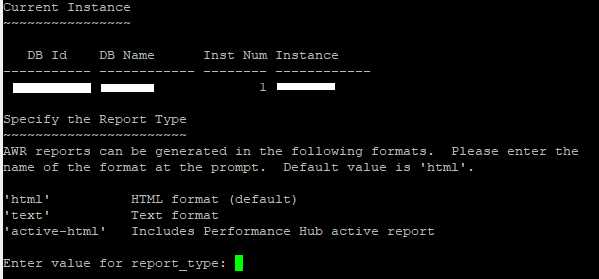
3. Choose the type of report by entering the value, out of three inputs ‘html’, ‘text’ or ‘active-html’. The default value is ‘html’. If you click ‘enter’ without giving any input then by default ‘html’ format report will be generated.

4. The next input which you need to provide is the number of days (i.e. num_days) to view the list of the snapshot. The result will provide all snapshot IDs and details for the given number of days. In the example, ‘1’ is given as an input to view the list of snapshots generated in 1 day.

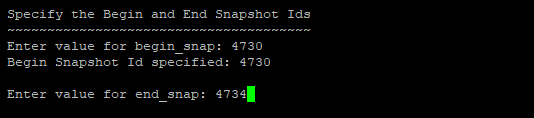
5. After getting the list of the snapshot, you need to choose the period for which you want to generate the report. The ‘Snap Started’ column shows the timestamp of the snapshot and the associated snapshot ID is present under the ‘Snap Id’ column; in the same row. You need to select the Snap Id from the list and provide as an input for ‘Enter value for begin_snap’.

6. Refer to the below screenshot, the value of ‘begin_snap’ is 4730. Now, the next input is for ‘Enter value for end_snap’ which is the Snap Id of a snapshot that needs to compare with begin_snap. 4734 (snapshot ID of time till that you need the AWR report) is the entered value shown in the below screenshot.
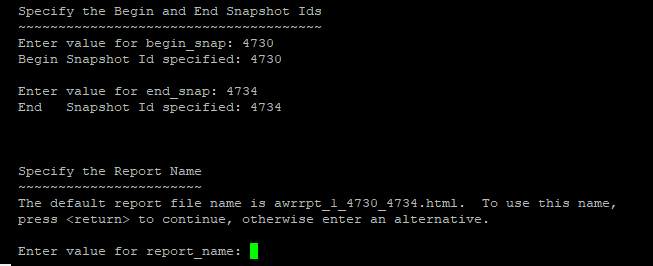
7. Next, you have to specify the report name. You can see the default suggested name on the prompt comprises of ‘awrrpt’ keyword, index number, begin snap ID, end snap ID and format of the report which are separated by the underscore (_). If you want then you can provide the name which is well suited for the report else you can hit enter.
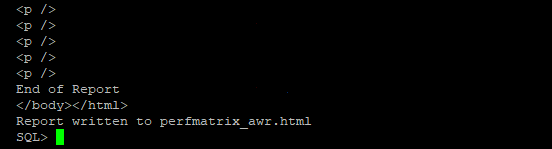
8. Once you provide the name and hit the enter key, the report generation starts and you can see the below message on the completion of report generation.
9. Enter ‘exit’ and check the generated report below path:
SQL> exit;
[oracle@test]$ pwd
/home/oracle
AWR Analysis:
After the generation of the AWR report, the HTML file report can be transferred to the local system for analysis purposes. You can open the AWR report in the browser and start the analysis. Refer to the below link:
Article Link: AWR Report Analysis Guide
Also, Brijesh Gogia in his post; provided a detailed description of each section of the Automatic Workload Repository report along with an analysis. Refer to the below link:
Article Link: http://expertoracle.com/2018/02/06/performance-tuning-basics-15-awr-report-analysis/
You may be interested: