tearDown Thread Group is a special type of JMeter Thread Group that can be utilized to perform Post-Test actions. The behaviour of the tearDown Thread Group is similar to the regular Thread Group element. The only difference is that tearDown Thread Group executes after the completion of normal Thread Group execution.
Similarly, setUp Thread Group helps to perform Pre-Test activities.
Important Note: By default, tearDown Thread Group won’t run if the Test is completed as expected. If you want to run it anyway, mark the checkbox ‘Run tearDown Thread Groups after the shutdown of main threads’ from the Test Plan element.
What is the use of ‘tearDown Thread Group’?
tearDown Thread Group is very much helpful to perform post-test activities like:
- To delete test users after completion of the test
- To delete the bulk of data/order/pending requests after completion of the test
- It is used to clear/delete datasets from a database for the next run
How to add ‘tearDown Thread Group’ in the script?
You can follow the below steps:
- Select ‘Test Plan’ node
- Right-click on the ‘Test Plan’ node
- Hover the mouse on ‘Add’
- Hover the mouse on ‘Thread (Users)’
- Click ‘tearDown Thread Group’
Input fields of the ‘tearDown Thread Group’:
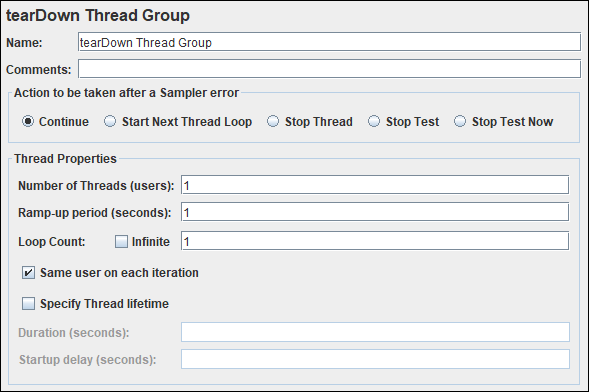
‘tearDown Thread Group’ element has the following input fields:
- Name: To provide tearDown Thread Group name. It could be a Test Case/Test Scenario name
- Comments: To write a comment related to the tearDown Thread Group
- Action to be taken after a Sampler error: Actions taken in case of sampler error occurs, either because the sample itself failed or an assertion failed etc. The possible choices are:
- Continue: When an error occurs then ignore the error and continue with the test.
- Start Next Thread Loop: When an error occurs then ignore the error, start next loop and continue with the test
- Stop Thread: When an error occurs then stop the current thread only which has the error.
- Stop Test: When an error occurs, stop the entire test when the current sampler of other threads completed the execution.
- Stop Test Now: When an error occurs in any thread, the entire test will stop abruptly. Any current sampler execution may interrupt.
- Number of Threads (Users): Number of users to simulate during the performance test.
- Ramp-up Period (seconds): How long JMeter should take to get all the threads started? If there are 10 threads and a ramp-up time of 100 seconds then each thread will be initiated at the interval of 10 seconds and at the 100th second all the threads get started.
Note: This is not the time between two threads to start up. - Loop Count: Number of times to iterate the test case. Alternatively, you can checkmark ‘Infinite’ to stop the test when the specified duration is over or stop the test manually.
- Same user on each iteration: On selecting the checkbox ‘Same user on each iteration’, when JMeter gets the cookie in the first response then it saves the cookie and uses it in the following requests; provided that you have added HTTP Cookie Manager.
- Specify Thread lifetime: Checkmark the box if you want to run the test for a particular duration or schedule a test. To get more information on scheduling a test in JMeter, refer to the article How to schedule JMeter test?
- Duration (seconds): This denotes the total duration of the test. Once you select the ‘Infinite’ option for ‘Loop Count’ then you need to provide the duration of the test to control the test execution.
- Startup delay (seconds): If you provide value for ‘Startup delay’ then JMeter adds the specified delay to start the test after pressing the ‘Run’ button. In Non-GUI mode, after hitting the test execution command, JMeter does not fire any request until the specified delay period is over. In simple words, the test starts at a time (=current system time + startup delay)
Possible Parent Element:
- Test Plan
Possible Child Element(s):
- Sampler
- Config Element
- Logic Controller
- PreProcessor
- PostProcessor
- Assertion
- Timer
- Listener
- Test Fragment
Following Element(s) can not be added as a child element:
- Non-Test Element
- Test Plan
- Another Thread Group
You may be interested: