
The goal-oriented scenario is very common in Microfocus LoadRunner where you can define the desired load in terms of user, hits, TPS, response time etc., but can you create the same in JMeter? LoadRunner automatically adjusts the other performance metrics according to the defined goal metric, to achieve the target goal. Refer to the link to get a detailed description of LoadRunner Goal-Oriented Scenario.
In Apache JMeter, there are some external plug-ins available which are helpful to create a goal-oriented scenario and help to achieve the defined goal. You can download these plug-ins from the given link:
https://jmeter-plugins.org/wiki/Start/
Although there are some limitations to creating a goal-oriented scenario in Apache JMeter, still we can see how and up to what extent a scenario with a defined goal can be prepared. Also, we will discuss the limitations.
1. User (Thread) Oriented Goal:
In Apache JMeter, users are termed ‘Thread’. If you have a normal scenario where users (threads) will ramp up at a certain time, perform their actions in steady-state and then exit so such a scenario can be easily prepared by using Thread Group element.
a. Basic Thread Group:
The basic Thread group element helps to prepare a basic scenario which includes ramp-up and steady state. Once the test duration is over all the threads stop. There are certain limitations of basic thread groups like:
- It is used to create only basic scenarios.
- Only ramp-up and steady-state can be simulated (information as per 4.0)
- Threads are ramp-up in a linear manner with the same delay. They can not be a ramp-up in batches like 5 threads in every 10 seconds etc.
- No option is available for a gradual ramp-down of the threads
- As soon as the test duration is over, threads become down.
- Spike Test and Step-up Test scenarios can not be created.
- Threads may exit without the completion of an iteration.

Refer to the link to get more details on Basic Thread Group.
b. Ultimate Thread Group:
To overcome the limitation of Basic Thread Group which are stated above, there are some external plug-ins available which can help a performance tester to simulate complex scenarios in an easy way, so that performance goal can be achieved by creating the desired workload. Among them, the first one is “Ultimate Thread Group”. This element can help you to overcome the limitations of Basic Thread Group up to some extent. With the help of Ultimate Thread Group, you can apply conditional load on the server.
How to configure Work Load using “Ultimate Thread Group”?
- Download the Ultimate Thread Group plugin through Link
- Add under Test Plan as shown in the below GIF
- Click on Add Row button to add more rows for the different numbers of users
- I am going to add 6 Rows for the users 10, 20, 30, 100, 100, 100, 100. So total of 460 users.
- Please refer to the configuration given below

Since Ultimate Thread Group has some good features, but still there are some limitations associated with this element which are:
- It requires a calculation of delay time while creating the scenario.
- Threads may exit without completion of the iteration
Refer to the link to get full detail on Ultimate Thread Group
c. Concurrency Thread Group:
The replacement for the Stepping Thread Group is the Concurrency Thread Group. Unlike Stepping Thread Group, it won’t create all the threads upfront so extra memory during the ramp-up period won’t be used. It’s a good replacement for Stepping Thread Group.
How to configure Work Load using “Concurrency Thread Group”?
- Download the Concurrency Thread Group plugin through Link
- Add under Test Plan as shown in the below GIF
- Set Target Concurrency (Total no. of Threads), Ramp Up Time (min), Ramp-Up Steps Count and Hold Target Rate Time (Steady State duration).
- I am going to set the scenario for 10 Users with 20 minutes Ramp-up period in 5 steps. The steady-state duration is set to 60 minutes.
- Please refer to the configuration given below
There are certain limitations of concurrency thread group like:
- It is used to create only basic scenarios.
- Only ramp-up and steady-state can be simulated (information as per 4.0)
- Threads are ramp-up only in 1 pattern.
- No option is available to set the ramp-down pattern of the threads
- A Spike Test scenario can not be created.
Refer to the link to get full detail on Concurrency Thread Group
2. Iteration Oriented Goal:
The next category of goal-oriented scenario is to achieve a defined number of iterations (End-to-End Journey). You need such types of goals when a client has a requirement to get X number of orders or ticket booking or product purchases etc. where quantity has been defined irrespective of the number of users. Please noted that you should also know the maximum number of users which you can define to control the iteration rate. Let’s try to understand how you can create an iteration-based goal-oriented scenario.
a. Arrivals Thread Group:
This thread group element is specially created for the case where no. of orders to be submitted in an hour; is known. For example, 2000 orders are purchased on an e-commerce every day, 1000 movie tickets are booked every hour on a movie ticket booking application, 10 licenses of software are purchased every minute etc. In such types of scenarios, more preference is given to the number of orders irrespective of the no. of users.
Apache JMeter adjusts the number of threads according to the target arrival rate. Now, here it is necessary to understand what is the arrival rate. The “Arrival Rate” word is used for the rate of iteration (order submission). If I say 10 licenses are purchased in a minute it signifies that 10 iterations need to be started in 1 minute. Hence the arrival rate will be 10/min. If I say 1000 movie tickets booked in an hour (16.6 = ~17/min), then it signifies that around 17 iterations should be started in 1 minute, so the arrival rate will be 17.
One point to be noted here, I did not talk about the number of users in the above-mentioned scenarios, it means that the arrival rate can be controlled by 1 or multiple threads. In case the arrival rate is too high then you can cap the number of threads. This option is available in the Arrivals Thread Group element. Another best thing about the Arrivals Thread Group is that all the active threads are stopped in a graceful manner at the end of the test. i.e. all the threads complete the last iteration and then exit from the test. Now, let’s try to understand the arrivals thread group with an example:
How to configure Work Load using “Arrivals Thread Group”?
- Download the Arrivals Thread Group via link.
- Add it to Test Plan as shown in the below GIF.
- Let’s consider, the requirement is to order 3000 products in an hour which means 50 products/minute.
- The ramp-up time is 5 minutes and the step count is 10.
- To control the number of threads, a concurrency limit is given to 50 users.
- The thread Iteration limit is blank to make infinite iterations by the users during the test duration.
- The hold target rate time is 60 minutes.
- Please refer to the configuration given below:
The limitations of the arrivals thread group like:
- It is used to create only basic scenarios.
- Only ramp-up and steady-state can be simulated (information as per 4.0)
- Threads are ramp-up only on the basis of arrival rate (no. of iterations need to start).
- A Spike Test scenario can not be created.
- Async Transaction Controller does not work under the Arrivals Thread Group
Refer to the link to get full detail on Arrivals Thread Group
b. Free-Form Arrivals Thread Group:
Arrivals Thread Group works on the rate of iteration per minute or second. To continue the same concept, Blaze-meter added some more flexibility and created another Thread Group element called “Free-Form Arrivals Thread Group”. The Arrivals Thread Group element has certain limitations, such as if you want to do a spike test then you can not create such a workload. Such a type of workload can be easily prepared by using the flexible feature of the Free-Form Arrivals Thread Group. Using Free-Form Arrivals Thread Group you can apply conditional load on the server. Free-Form Arrivals Thread Group also ramp-down the threads gracefully by letting the users complete the iteration before exiting from the test.
How to configure Work Load using “Free-Form Arrivals Thread Group”?
- Download the Arrivals Thread Group via link.
- Add it to Test Plan as shown in the below GIF.
- Click on Add Row button to add more rows for different numbers of users
- Please refer to the configuration given below
Refer to the link to get full detail on Free-Form Arrival Thread Group
3. Request Oriented Goal:
In such types of goals, we need to achieve the defined number of requests in an hour. Such types of goals can be targeted by Throughput Timers. Just to recall in terms of Apache JMeter the meaning of Throughput is ‘requests per second’ or ‘samples per second’ send to the server by JMeter. There are 2 important elements which help to emulate the goal-based scenario when the number of requests is known and the target to achieve.
a. Constant Throughput Timer:
This timer tries to maintain a constant throughput during the test and achieve the target. Of course, if the server is not able to handle such a load, the throughput will be lower. Throughput may decrease if other timers contradict the Constant Throughput timer. Hence it is not recommended to use other timers along with Constant Throughput Timer.
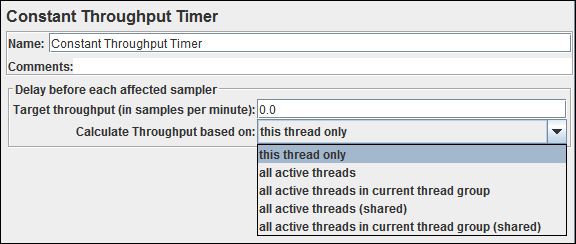
If you want to execute a Goal-oriented scenario where the number of concurrent users does not much important, but the number of requests per second need to be achieved then a Constant Throughput Timer is best for such type of scenario. A Constant Throughput Timer works precisely on the “minute” level, so make sure that your test lasts long enough (1 minute or more) and that you use a reasonable ramp-up time to avoid spikes (unless you’re doing some form of stress testing).
Since the constant throughput timer is a scope-based element, so make sure you add the timer at the correct level. The rate of samplers is calculated based on which option you have selected from “Calculate Throughput based on:”. To get more details about the scope of the timer, please refer to the blog Scope of Timers
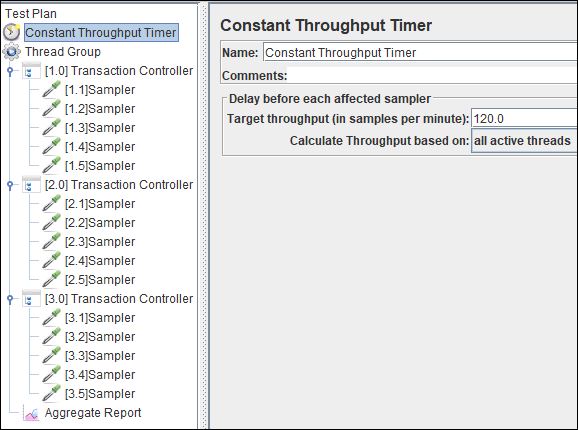
How to configure Work Load using “Constant Throughput Timer”?
- Add “Constant Throughput Timer” under Test Plan as shown in the below GIF.
- Provide the target throughput (in samples per second) value as per your performance goal.
- Add a basic thread group and provide a calculative thread count.
- Please refer to the configuration given below. There are a total of 15 samplers (requests) distributed among 3 transactions. The number of threads is 5 and the test duration is 5 minutes. The target throughput rate is given 120 samples per minute.
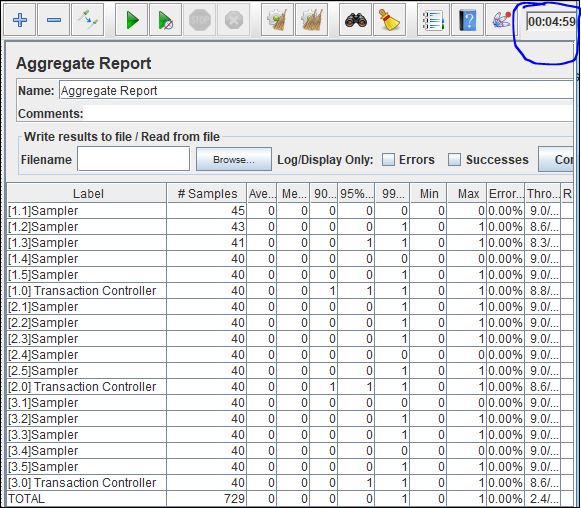
Note that the transaction count does not include by Constant Throughput Timer, so if you add the count of all the samplers then you will get 609 (~600). Since we have given a target throughput is 120/min and in 5 minutes, 600 requests should be generated. Hence we achieve the goal.
There are some limitations of Constant Throughput Timers which are:
- Other timers may impact the constant throughput timer target, so it is recommended not to use other timers.
- To get the exact sampler’s count at the end of the test, you need to eliminate the transaction’s count from the aggregate report to check whether the constant throughput timer is working fine or not.
- The achieved target may be slightly high.
- The threads do not stop in a graceful manner. Once the test duration ends, then all the threads stopped; even though they are in the middle of the iteration.
- You need to decide the number of threads wisely so that a real-time scenario can be prepared.
- Step-up and Spike Test scenarios can not be prepared using a constant throughput timer.
Refer to the link to get full detail on Constant Throughput Timer
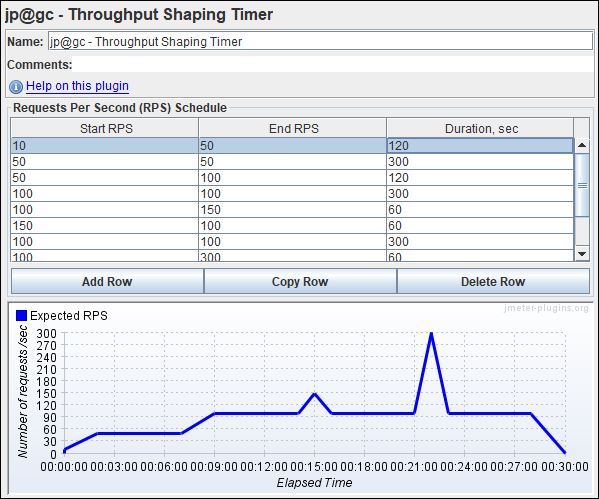
b. Throughput Shaping Timer:
To overcome the limitations of the Constant Throughput Timer, another timer called the “Throughput Shaping Timer” can be added in the test plan to prepare a goal-based scenario where the target is to achieve desired RPS (requests per second) with the distributed load. The same scenario configuration settings, we have seen for Ultimate Thread Group and Free-Form Arrivals Thread Group. The only difference in all these 3 JMeter elements is:
- Thread rate is distributed in the Ultimate Thread Group
- Iteration rate is distributed in the Free-Form Arrivals Thread Group
- Request (Samples) rate is distributed in Throughput Shaping Timer
How to configure Work Load using “Throughput Shaping Timer”?
- Download the plug-in of the Throughput Shaping Timer through the given Link.
- Let’s consider, the requirement is to create a spike test to check 150 requests and 300 requests load at different times. The average load is 100 RPS.
- Click on Add Row button to add rows to prepare the scenario.
- Please refer to the configuration given below:
Refer to the link to get full detail on Throughput Shaping Timer