
LoadRunner integration with AppDymanics provides a complete solution for the Performance Testing and Monitoring of the server resources. The benefits of LoadRunner and AppDynamics integration include the mapping between LoadRunner User Transactions and AppDynamics Business Transactions. However, LoadRunner simulates end-user activity by virtually generating the user, simulating the browser and executing an HTTP request. AppDynamics fetches the name of the LoadRunner Transaction stores the metrics in an AppDynamics business transaction and provides the result.
The simplest and fastest way to get LoadRunner transactions in AppDynamics is to add a custom header that contains the LoadRunner transaction name in the request so that AppDynamics can display the transactions exactly as they appear in LoadRunner. Adding a custom header in LoadRunner is a simple process using LoadRunner’s built-in capability to set headers, including custom headers. The result gives you the same visibility as you have in LoadRunner, but with the following added benefits:
- Deep code-level visibility, in the context of a LoadRunner Transaction
- Application container-level data such as Heap size and usage along with standard and custom JMX metrics
- Deep database visibility, in the context of the transaction, including details of SQL breakdowns
- Extended visibility into application infrastructure (CPU, Disk, Network, and Memory).
Steps for LoadRunner Integration with AppDynamics:
LoadRunner Set-up:
Step 1: Launch LoadRunner, record the user flow and complete the test script by applying appropriate correlation, parametrization etc. In the case of web services, upload the services request body to the LoadRunner script by choosing the appropriate option under the Web-Service protocol.
Step 2: Add web_add_header() before the start of each transaction and pass the header name as ‘AppD_Header’ and its value i.e. name of the transcation. For example:
Action()
{
	web_add_header("AppD_Header", "Login");

	lr_start_transaction("Login");

	web_submit_form()
	.......................

	lr_end_transaction("Login");

	web_add_header("AppD_Header", "Search");

	lr_start_transaction("Search");

	web_url()
	.......................

	lr_end_transaction("Search");
	.
	.
	.
	.
	.
	web_add_header("AppD_Header", "Logout");

	lr_start_transaction("Logout");

	web_submit_form()
	.......................

	lr_end_transaction("Logout");

	return 0;
}
AppDymanics Set-up:
Step 1: Launch AppDynamics Controller.
Step 2: Go to the ‘Application’ Tab -> ‘Configuration’ (in the left panel) -> Instrumentation.

Step 3: Under the ‘Instrumentation’ tab, go to the ‘Transaction Detection’ tab. In the ‘Custom Match Rules’ section, click the ‘+’ button.

Step 4: Select the entry point type for this rule as ‘Servet’ and click ‘Next’.

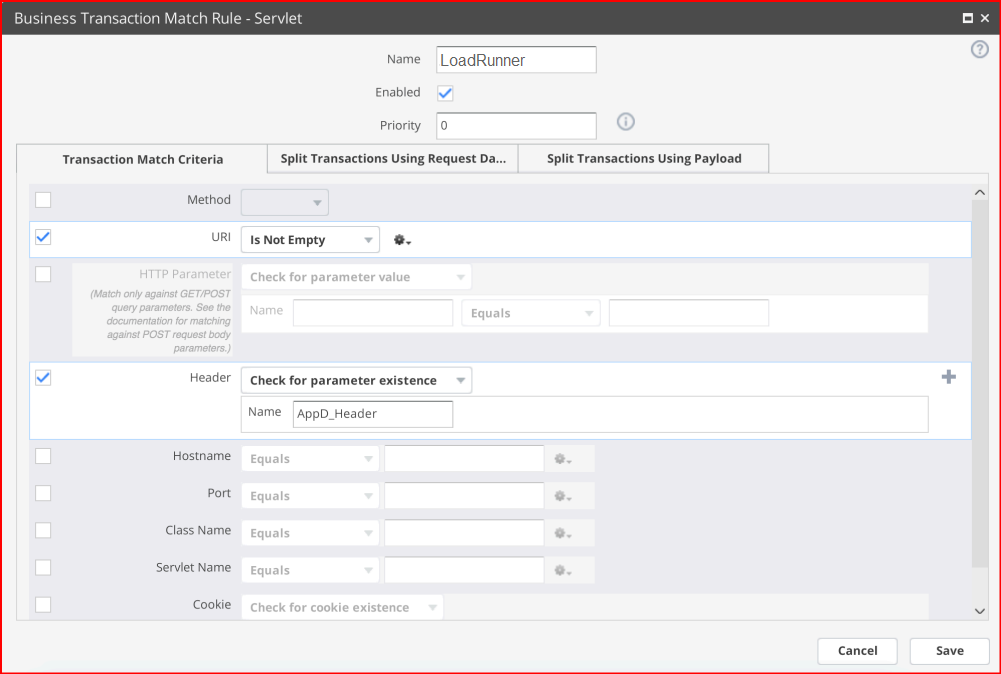
Step 5: In the ‘Transaction Match Criteria’ tab, set the following values for respective fields:
- Name: LoadRunner
- Enabled: <Check Mark>
- Priority: 0
- URI: is Not Empty
- Header: Check for parameter existence
- Name = AppD_Header
Step 6: Click on the tab ‘Split Transactions Using Request Data’ and set the following values:
- Check mark ‘Split Transactions Using Request Data’
- Select ‘Use a header value’ in Transaction names
- Set ‘Header Name’ as ‘AppD_Header’. This is the same value, added in HTTP Header Manager in Step 4 of LoadRunner Set-up.

Step 7: Click ‘Save’
Like-wise you can complete the integration of LoadRunner and AppDynamics.
You may be interested:
- LoadRunner Tutorial
- Apache JMeter Tutorial
- JMeter Integration with Different Tools
- Performance Engineering Tutorial