
The automatic correlation implies that the LoadRunner (VuGen) finds the dynamic value based on some rules that are predefined or manually added before recording which VuGen applies after script generation and script replay. The automatic correlation can be applied:
- Before Recording (Rules)
- After Recording (Record)
- After Replay (Replay)
You can remember R3 (Rule, Record, Replay) as a thumb rule for automatic correlation methods.
Let’s discuss in detail how to apply an automatic correlation in the Vuser script.
a. Before Recording:
In this method, you can set up some correlation rules in VuGen before going to start the recording. However, setting up rules for correlation is possible only when you know the dynamic values that need to be correlated before recording. Since most of the applications are new and many times a performance tester does not know the internal functionality of the application, it is hard to predict the dynamic value before recording the script. Hence this method is used very rarely. If you are familiar with the application very well and know all the dynamic values then you can create correlation rules that will automatically identify the dynamic values while you record the application.
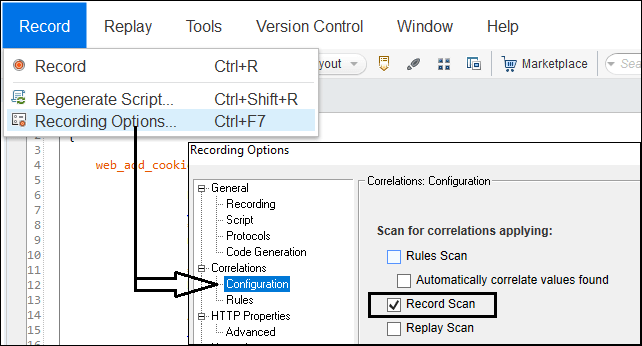
To use the autocorrelation feature of LoadRunner, you have to enable the ‘Automatically apply correlation rules’ option which is available at:
Recording Options -> Correlations -> Configuration -> Scan for correlations applying -> Rule Scan -> Automatically correlate values found.
Select this option so that the identified dynamic values can be correlated automatically based on the defined rules. Refer the below Figure 01:

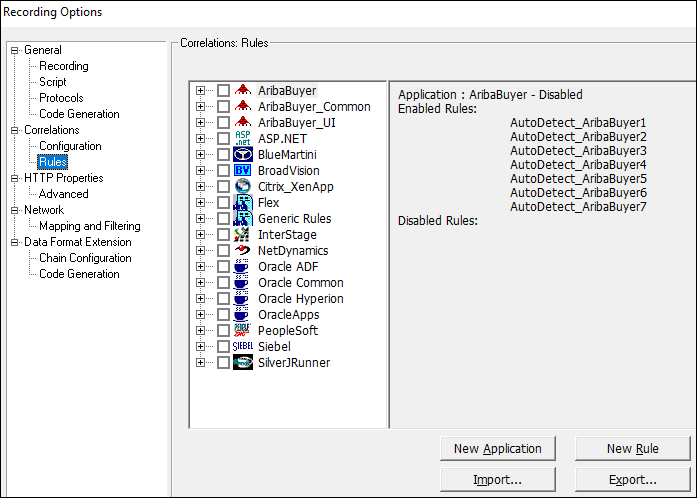
Additionally, there are some correlation rules that are predefined in VuGen for supported application servers. You can enable, disable, add and delete the rules using the below option:
Recording Options -> Correlations -> Rules
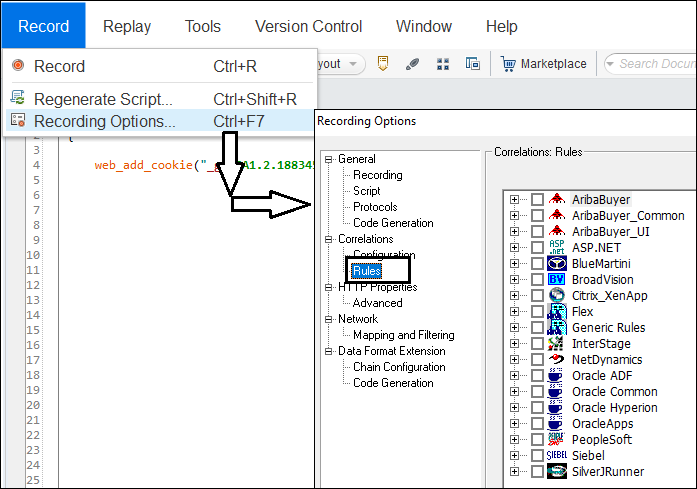
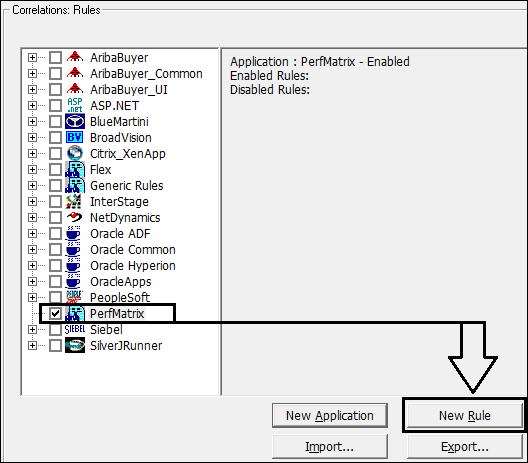
How to add a new rule for automatic correlation in LoadRunner?
1. Go to Record -> Recording Options -> Correlations -> Rules
2. Select the type of the application from the given list OR add the application by clicking the ‘New Application’ button.
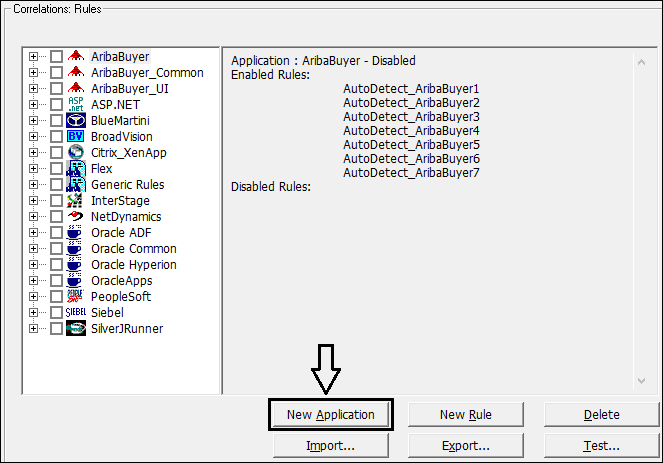
3. Add ‘New Rule’ for the newly added application.
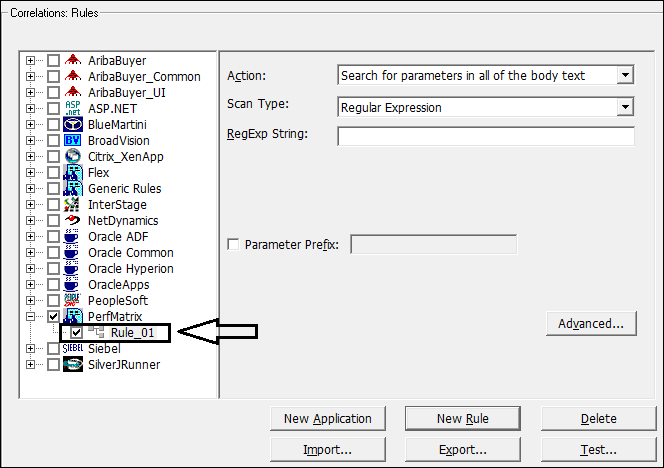
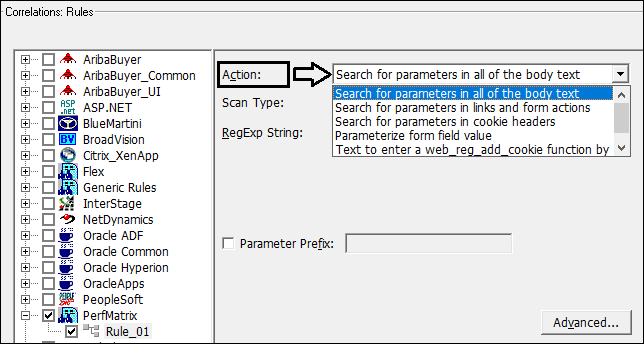
4. Select the appropriate “Action” from the given list
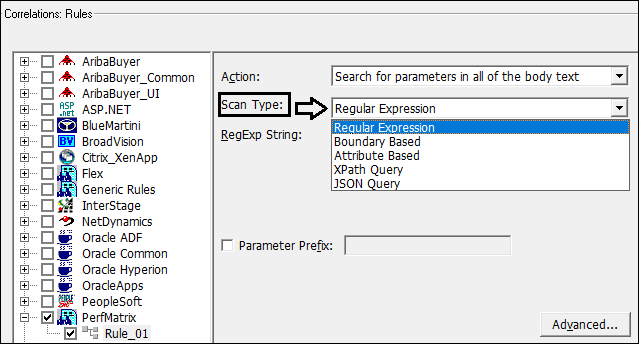
5. Select the appropriate ‘Scan Type’ from the given list. If you are comfortable writing regular expressions then choose ‘Regular Expression’ else ‘Boundary Based’ is the easiest way because in this you just need to provide Left and Right Boundaries of the dynamic value.
6. Provide appropriate input(s) as per the selected ‘Scan Type’ option.
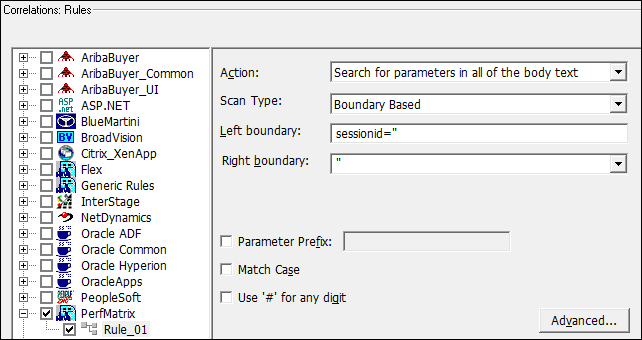
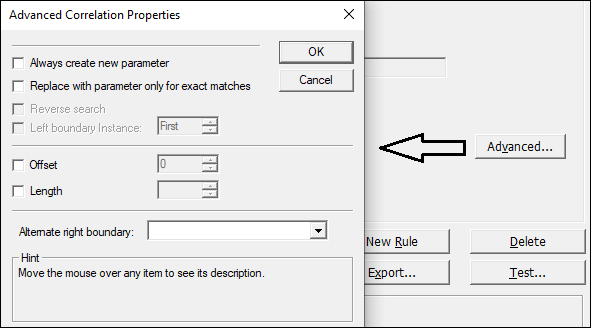
7. The ‘Advanced’ option provides some additional settings like Always create new parameters, Replace with parameter only for exact matches, Reserve Search, Offset, Length etc. The advanced properties depend on the selected Scan Type. Hence some of the properties could be disabled.
7. Once you added the rule click the ‘OK’ button.
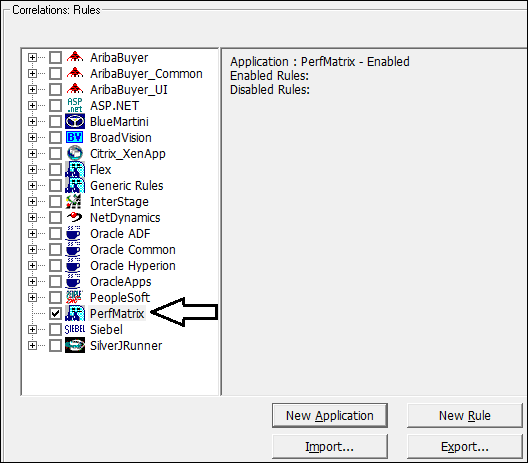
Next time you record the application VuGen detects the dynamic values based on the defined rule and replaces them with a correlation parameter.
b. After Recording:
This method is helpful when you do not have a custom correlation rule and instruct VuGen to find out the dynamic values based on some pre-defined rules provided by LoadRunner. Once the script is recorded completely VuGen has the ability to find out a significant percentage of dynamic values based on certain predefined rules. To use this feature you need to enable the ‘Record Scan’ option by following:
Record -> Recording Options -> Correlations -> Configuration -> Scan for correlations applying -> Record Scan
By default, the ‘Record Scan’ option is enabled.
VuGen automatically creates correlation parameters for the identified dynamic values and adds to the script. Using this method 60-90% of dynamic values can be correlated automatically. If you are in the learning stage of performance testing then it would be advisable not to use this method because the more you dig for finding dynamic value in the script manually, the more you learn.
How to correlate dynamic values after recording?
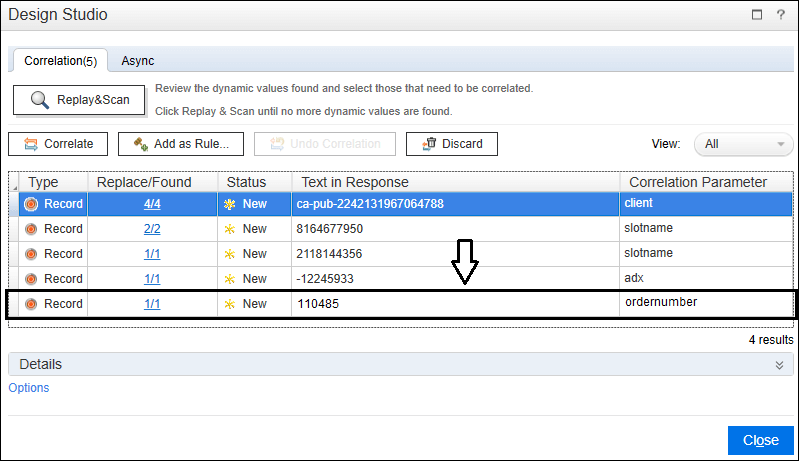
1. On the completion of the recording, you will get the ‘Recording Report’ in which the ‘Design Studio’ option is available. Click and open the ‘Design Studio’ window. In this window, you may get all the dynamic values (as text) and correlation parameter names (suggested by VuGen). It depends on you to which value you want to correlate.
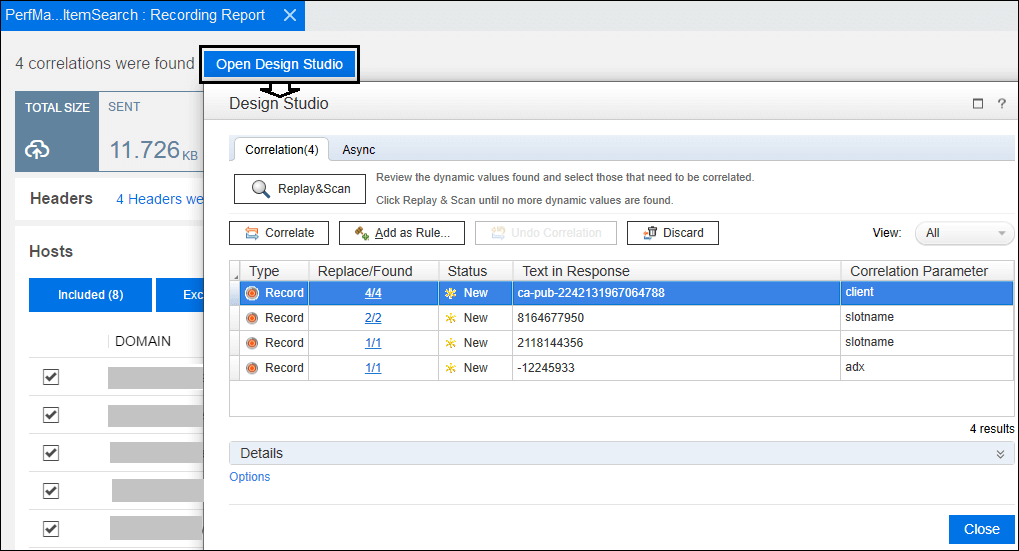
2. To correlate the value you need to select the row and click the “Correlate” button
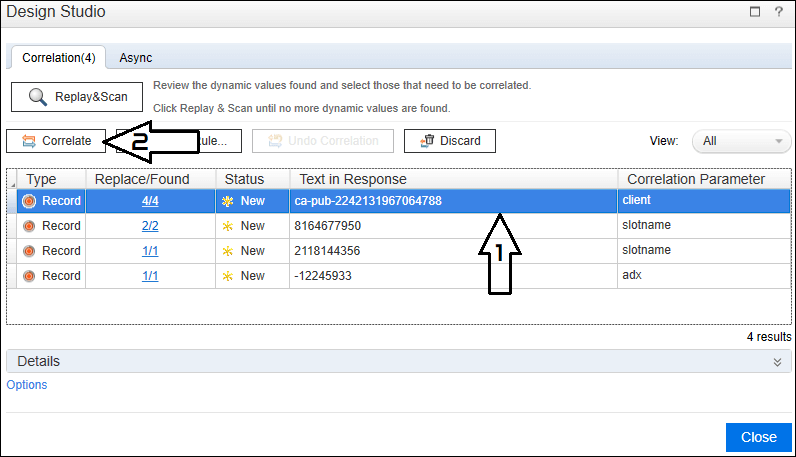
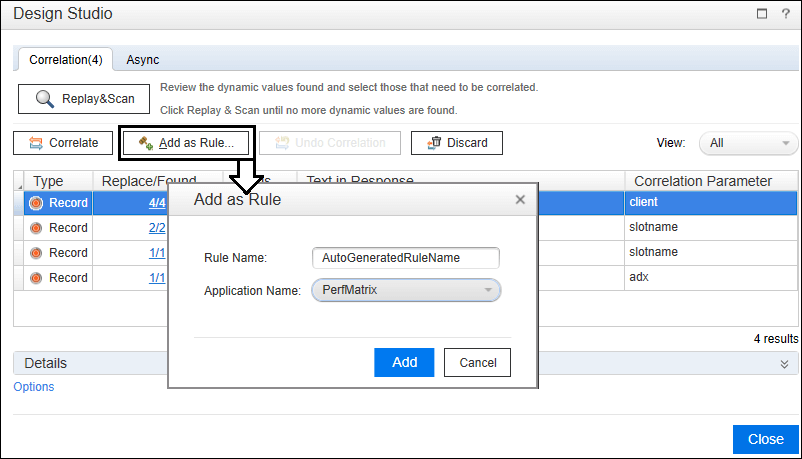
3. You can also add a new rule that could be helpful for future recording. The new rule can be added using the ‘Add as Rule…’ button.
4. After applying the correlation, click the ‘Close’ button and check the correlated part of the script.
As stated earlier, in this method, VuGen detects the dynamic values based on the pre-defined rules and provides suggestions for correlation. It is up to you whether to correlate the suggested value or not. On correlating the suggested value, VuGen inserts a correlation function at an appropriate place and replaces all the related dynamic values with a correlation parameter.
Again, if you are in the learning stage then prefer manual correlation rather than autocorrelation.
c. After Replay:
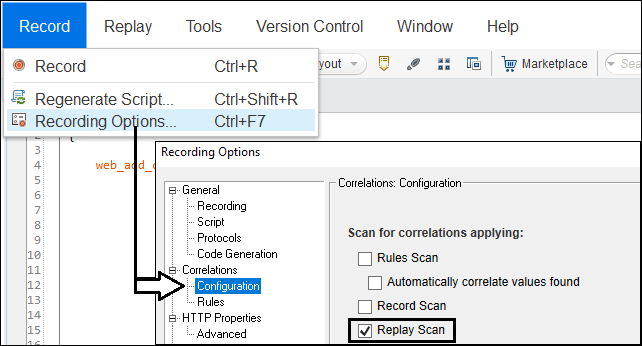
There are certain dynamic values for which replay is mandatory so that those values can be identified properly and replaced with a correlation parameter by Design Studio. It may happen that you need to apply ‘Replay and Scan’ multiple times until all the dynamic values get correlated. This is possible only when VuGen finishes at least one iteration completely (i.e. End to End). To enable this method you have to first choose the ‘Replay’ option by following the navigation path:
Record -> Recording Options -> Correlations -> Configuration -> Scan for correlations applying -> Replay
By default, the ‘Replay’ option is enabled.
1. On the completion of the recording, you will get the ‘Recording Report’ in which ‘Design Studio’ option is available. Click and open the ‘Design Studio’ window. In this window, you will see ‘Replay and Scan’ option. Click on this button.
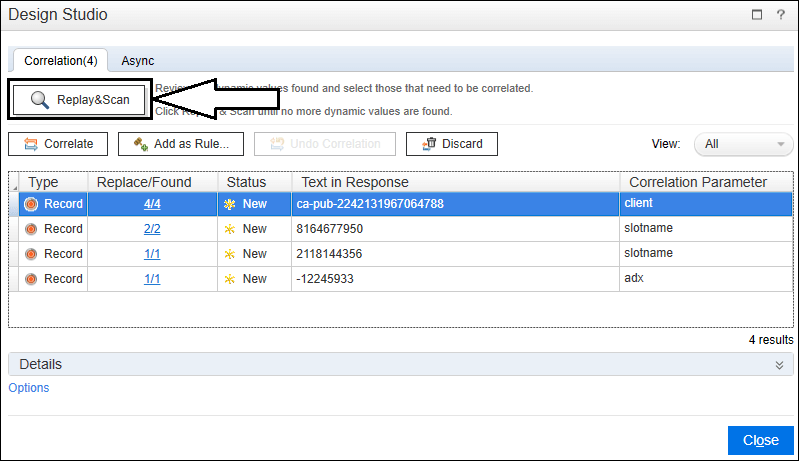
2. VuGen starts replaying the script and tries to find out some additional dynamic value (if any).
Useful Tips:
- On the completion of recording, open ‘Design Studio’. It scans the script for rule and record-based correlation. If you suspect that there could be some more dynamic values then choose the ‘Replay & Scan’ option for replay-based correlations. Repeat the same process until the Design Studio finds a new dynamic value.
- You can directly open the ‘Design Studio’ from the VuGen menu:
Design -> Design Studio
OR
Press ‘Ctrl+U’. - Even before starting the script recording, you can enable all three options (Rule, Record and Replay).
- Remember that VuGen has an autocorrelation feature which provides a quick solution by identifying some dynamic values based on the defined rules. It does not mean that VuGen detects all the dynamic values. Hence you may also require manual correlation to make the script executable for Performance Test.
You may be interested: